Build Your Own LED Sign — Exclusive Referral Access
Premium LED signs at referral-only pricing. No salespeople, no commissions — just great value and direct access.
Start Building Your SignWhy Choose SignRack?
- Premium Quality — Bright, durable LED signs built to last.
- 5-Year Warranty — With prorated coverage to keep your investment protected.
- Direct Access Pricing — Skip commissions and sales markups.
- DIY Friendly — Designed for installers, electricians, and organizations who want savings without sacrificing performance.
How It Works (Short Summary)
-
Step 1 — Build Your Sign
Use our DIY configurator to select your size, pitch, and options.
-
Step 2 — Place Your Order
Secure your order with just $250 down.
-
Step 3 — Track Your Build
We assemble and test your sign, then give you a live link to track production.
-
Step 4 — Delivery & Support
Your sign ships ready to install, with full documentation and customer support when you need it.
Exclusive Referral Offer
This referral-only page gives you access to special deals you won’t find anywhere else. When the timer runs out, the offer is gone — no extensions, no second chances.
What You Get:
-
Up to 39.7% Off the list price on LEDSignCity.com
-
90 Days of Free Graphic Design Services our designers create your ads at no cost
-
Beacon Series Upgrade 1,600 pixels per module for crystal-clear, high-quality display
-
Free Cloud Software no monthly subscription fees
-
Fanless Solid-State Design durable with no moving parts
-
5-Year Warranty unmatched peace of mind
One unbelievable low price. For a limited time only, while stocks last.
FAQs
-
What’s included with my order?
Every LED sign includes the display cabinet, power supplies, control system (WiFi standard, 4G optional), and software. You’ll also get a complete installation and setup guide tailored to your sign’s dimensions.
-
What’s not included?
We don’t include mounting structures, electrical service to the sign, or installation labor. Most customers use a local electrician or installer for this work, which gives you total control over your project cost.
-
How much is shipping?
Flat delivery fee of $399 anywhere in the continental U.S. Larger custom signs may require freight arrangements, which we’ll confirm before shipping.
-
What is the lead time?
Standard build time is 6–8 weeks depending on size and configuration. You’ll receive a live production tracking link so you can see your sign’s progress step-by-step.
-
What payment methods are accepted?
We accept all major credit cards, ACH payments, and wire transfers. Financing options are available on request.
-
Do I have to pay the full amount today?
No. You can lock in your build with a $250 non-refundable deposit. The remaining balance is due before shipping.
-
Can I get help during installation?
Yes. Our support team is available by phone, email, and remote login. We’ll walk your installer through setup if needed, at no additional charge.
Setup Guide / Installation Resources
Start using your LED sign right away! Follow the link below, enter your sign dimensions, and instantly receive customized instructions tailored specifically for your sign.
Phase 1: Verify Your components
| Component | Description | Single Sided | Double Sided |
|---|---|---|---|
| LED Sign Sections | Numbered sections with an included diagram for proper assembly | - | - |
| Power Cables | Used to deliver power from the Breaker box to each section | - | - |
| Power Cables - Jumpers | Used to deliver power from one section to another section | - | - |
| Signal Cables | Ensure data is sent between sign sections or controller | - | - |
| Brightness Sensor | Automatically adjusts display brightness based on ambient light | - | - |
| Antenna | For wireless communication (if applicable) | - | - |
| Ethernet Cables | For wired connections (especially during setup or troubleshooting) | - | - |
| PoE Adapter | Powers devices like the control box via Ethernet (if included in your setup) | - | - |
| X Brackets | For securing sections together during mounting | - | - |
| L Brackets | For wall or pole mounting depending on configuration | - | - |
| M8 Bolts | Used for securing brackets or support structure | - | - |
| M10 Bolts | Heavy-duty bolts for mounting the LED sign structure | - | - |
| Replacement Modules | Replacement LED Modules | - | - |
Phase 2: Repeater Configuration
Step 1: Prepare for Setup
B. Unplug the Antenna from the sign.
Step 2: Connect the POE Adapter and Antenna to the PC
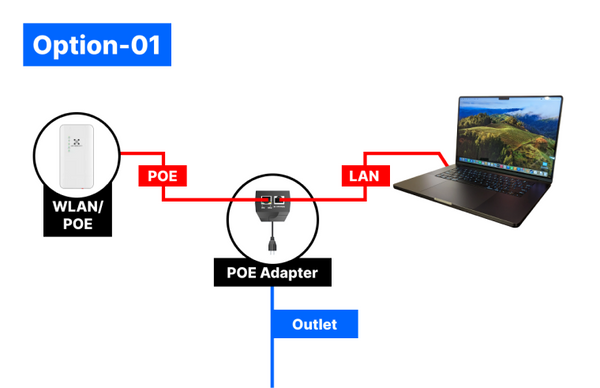
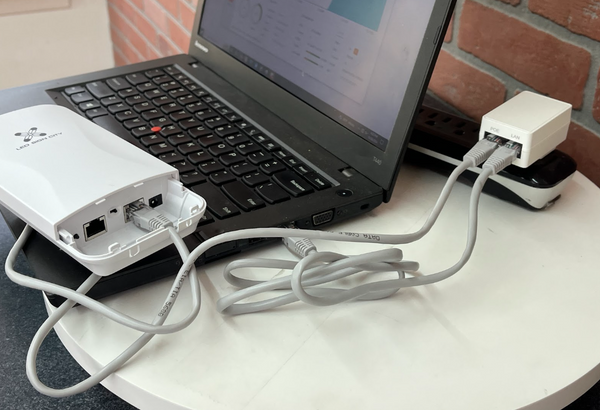
C1. Connect the Antenna (If PC has Ethernet Port):
- Take a POE adapter, the antenna, and an Ethernet cable.
- Connect the POE cable from the antenna to the POE adapter.
- Connect another Ethernet cable from the laptop to the POE adapter.
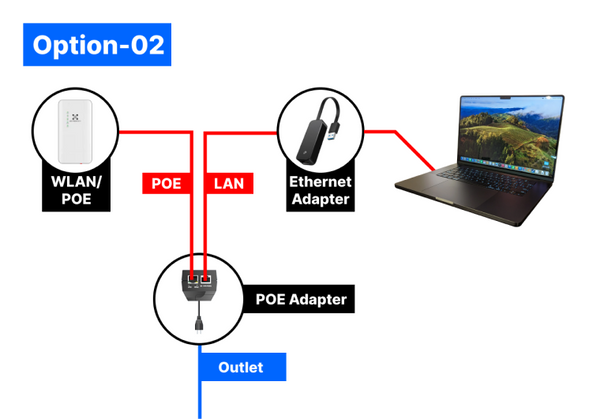

C2. Connect the Antenna (If PC does not have Ethernet port):
- Take a POE adapter, the antenna, an Ethernet adapter, and an Ethernet cable.
- Connect the POE cable from the antenna to the POE adapter.
- Connect another Ethernet cable from the USB adapter to the POE adapter.
- Connect the USB adapter to the laptop/PC.
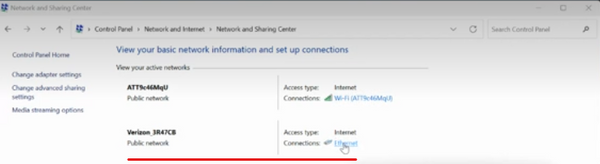
Step 3: Adjust Network Settings of the New Setup
D. Configure Network Settings:
- Go to Control Panel > Network and Internet > Network and Sharing Center.
- Identify your network adapter connected to the antenna.
- Click Ethernet > Properties > Internet Protocol Version 4 (TCP/IPv4).
- Set the IP address (e.g., 192.168.188.127 for your computer).
- Set the Subnet Mask to 255.255.255.0.

Step 4: Test the Connection
E. Ping the Antenna:
- Open Command Prompt (type CMD in the Start menu).
- Type
ping 192.168.188.253to test the connection.
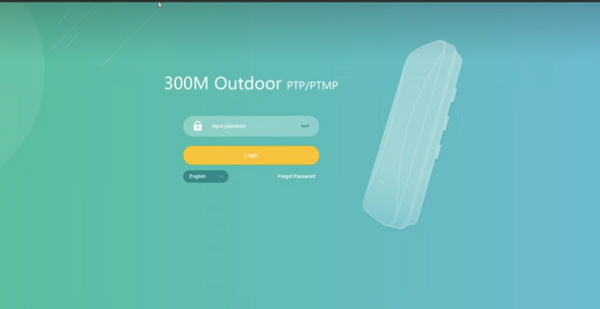
Step 5: Access the Antenna Interface
F. Log into the Antenna:
- Open a web browser tab and type in 192.168.188.253.
- Use the username/password: admin.
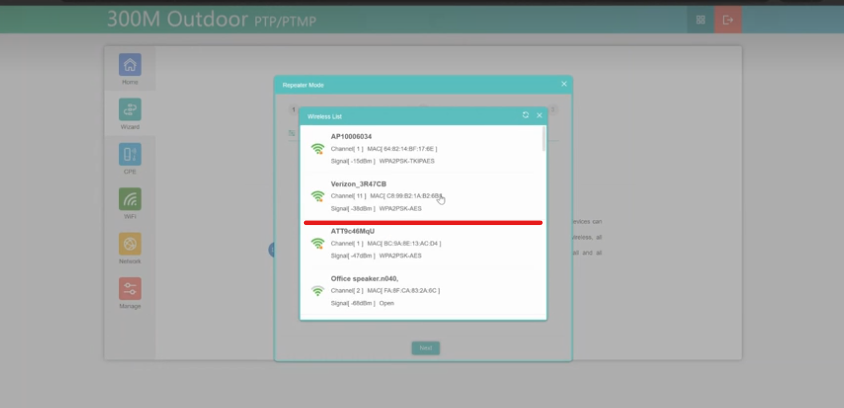
Step 6: Configure the Antenna
G. Go to the Wizard:
- Click on the Repeater Mode icon.
- Scan for the Wi-Fi network you want the sign to connect to.
H. Select the Network:
- Pick the desired Wi-Fi network from the list.
- Enter the Wi-Fi password.
Step 7: Finalize Antenna Setup
I. Click Next:
- Keep the default settings.
- Ensure the connection is set to DHCP.
J. Page Refresh:
- The page will automatically refresh to the new internet network.
- If the password was incorrect, repeat steps G-H and re-enter the password.
- If you see the SSID of the chosen network as the sign's network, the antenna has been successfully programmed.

Step 8: Reset IPv4 Settings
K. Revert Network Settings:
- Go back to Control Panel > Network and Internet > Network and Sharing Center.
- Click Ethernet > Properties > Internet Protocol Version 4 (TCP/IPv4).
- Select the Default Settings.
Step 9: Reconnect Antenna to the Sign
L. Reconnect:
- Unplug the antenna from the adapter.
- Reconnect the antenna to the sign.
- Power the sign back on.
Phase 3: Setup & Assembly Guide
Bringing your LED sign to life involves careful unpacking, precise cabinet alignment, and proper structural support. This guide walks you through the process—from uncrating to final bracket installation—alongside helpful videos and visuals.
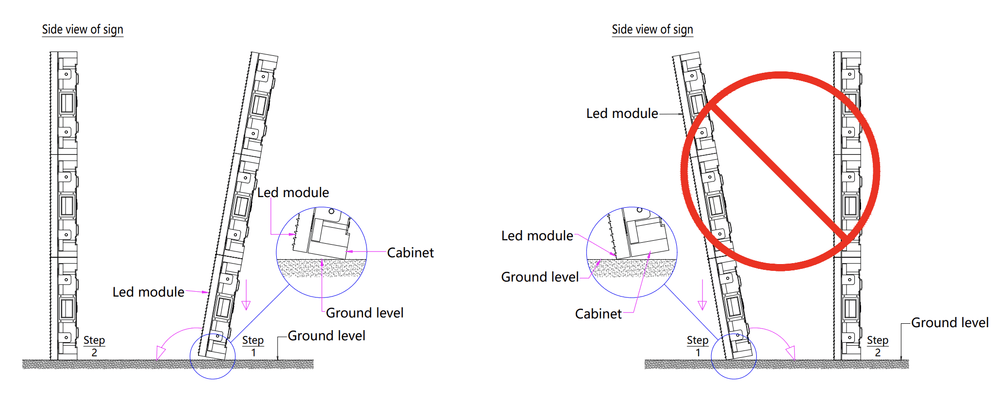
Handling Tips – Unpacking Your LED Sign
Tip #1: Always keep the crate upright
Never lay it flat on any side. Internal bracing is
designed for upright handling only.
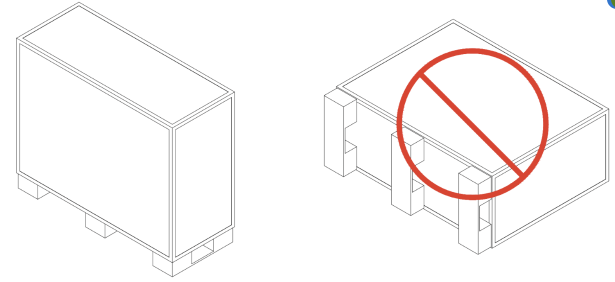
Tip #2: Do not rest the sign on the LED modules
When unpacking, avoid placing pressure or
weight on the front of the sign. Always support from the frame edges.
Required Equipment
Tools (Not Provided):

13/14 MM Ratcheting Wrench

17 MM Socket
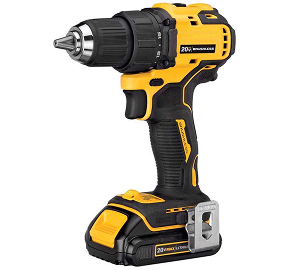
Drill/Driver
Hardware (Provided):
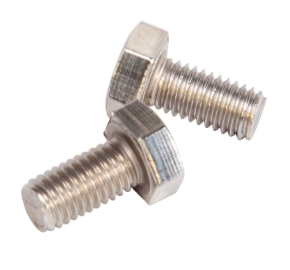
M8 Bolts – For connecting cabinet sections
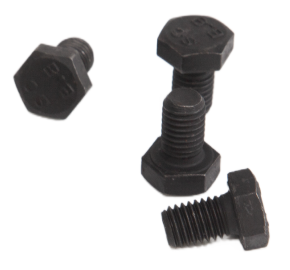
M10 Bolts – For securing X Brackets
X Brackets – Used at 4-cabinet intersections
Mounting Brackets – To support and install the complete sign
Watch Before You Begin
Video 1: How to Uncrate Your LED Sign
Step-by-step instructions for connecting cabinet sections, installing X Brackets, and preparing for mounting.
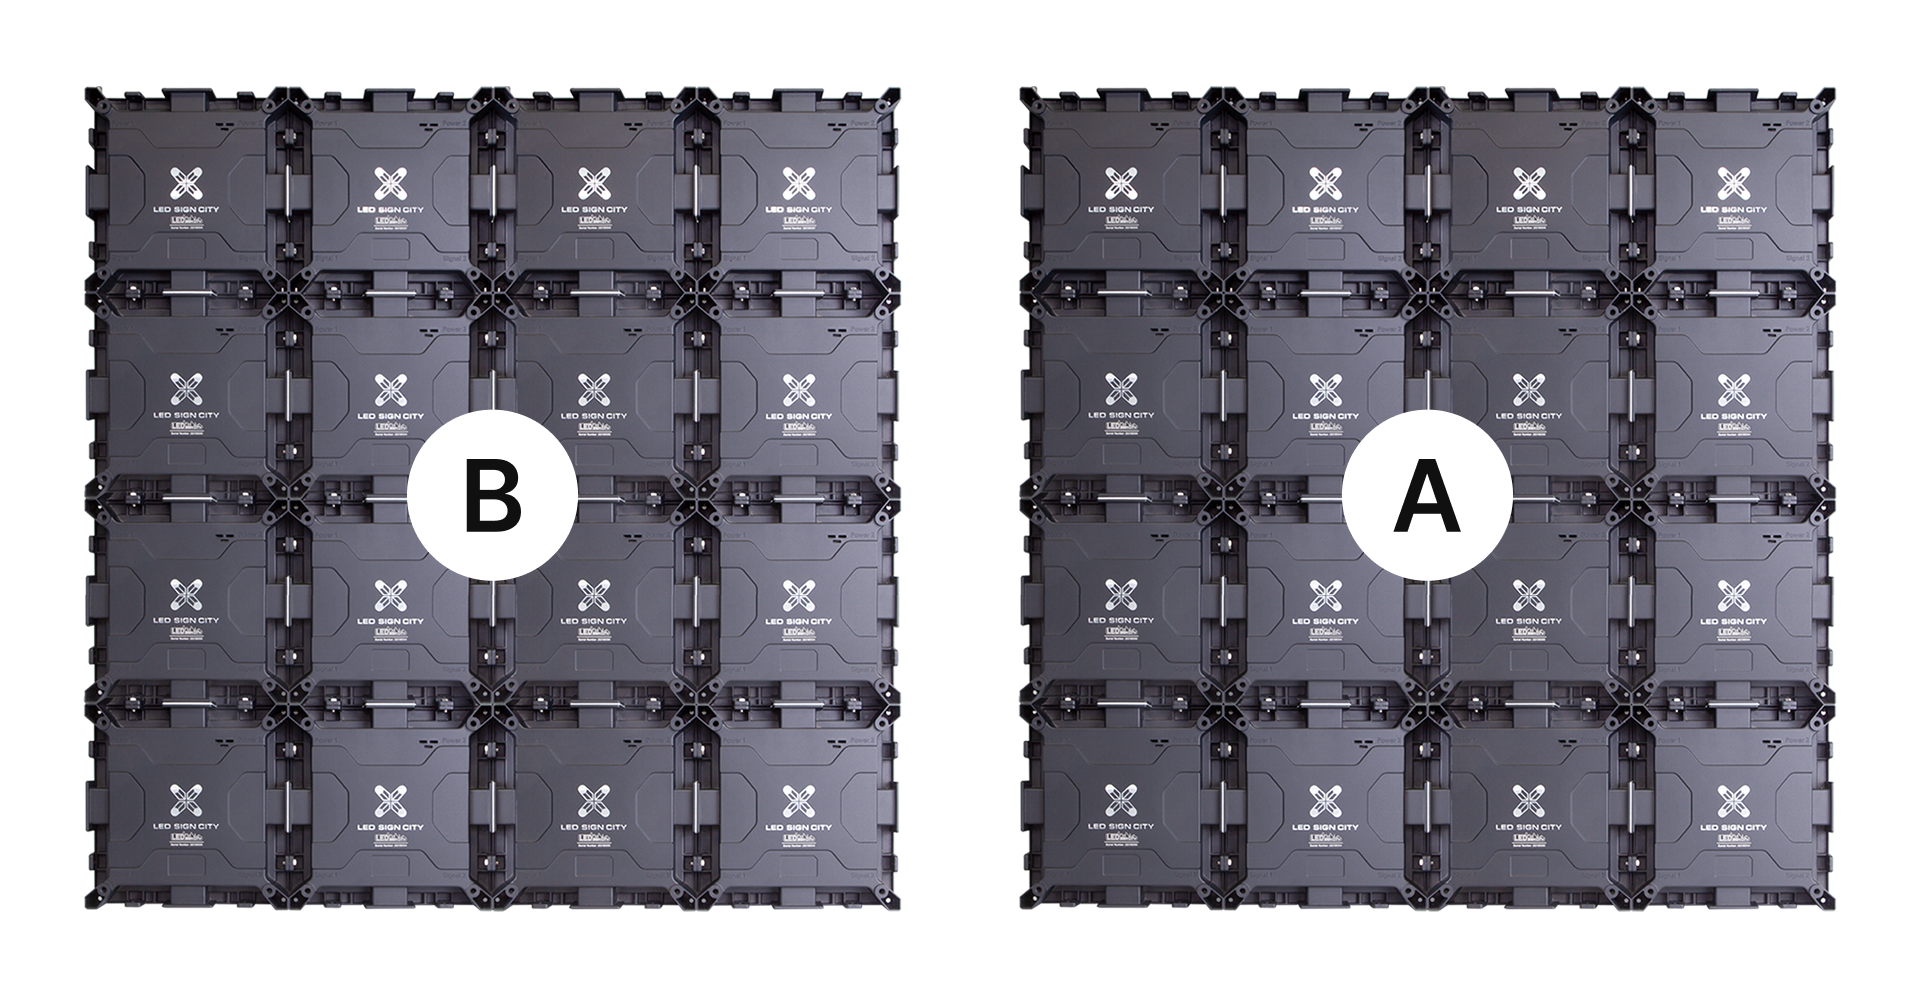
Step 1: Inspect and Identify Cabinet Edges
Before assembly, check each cabinet section. You will see three types of edge configurations:
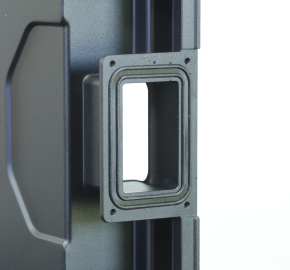
Open Tunnel with Rubber Seal: Must be fully seated before bolting.
Open Tunnel with Center Metal Gasket
Closed Tunnel with Solid Metal Gasket
> Orientation Tips:
From the front of the sign, arrange cabinets A, B, C from left to right
From the back, A, B, C will appear right to left
All outer edges must be sealed with closed metal gaskets
Only connect open tunnels to open tunnels
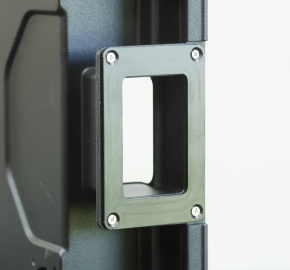
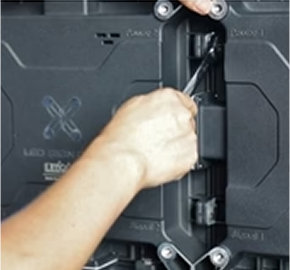
Step 2: Connect Cabinet Sections Using M8 Bolts
- 1. Align each cabinet section so that the clear hole lines up with the threaded hole on the next unit.
- 2. Insert M8 bolts (2 per tunnel). Each side typically has top and bottom bolts.
- 3. Use a 13/14MM wrench to tighten all M8 bolts securely.

Connect Section A and Section B
Insert the bolt through the Clear Hole and screw it into the threaded hole to hold the signs in position. Each cabinet has two holes on the side.
Use the provided socket to fasten the upper and lower bolts on the side each cabinet.
Continue following the same pattern of rows and columns used in the preassembled sections. The layout and gasket placement will mirror the configuration already in place, ensuring consistency and a secure connection throughout the entire sign.
> For Signs Taller Than 5 Feet (Multi-Row Builds):
When stacking rows vertically, insert
additional M8 bolts where cable tunnels align between rows.
Install a rubber gasket on the top of the bottom section
Install an open-center metal gasket on the bottom of the upper section
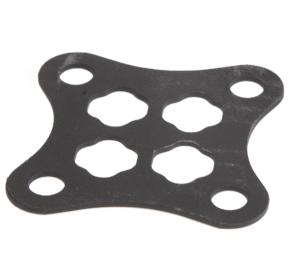
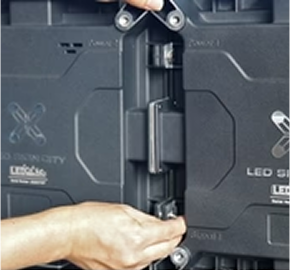
Step 3: Install X Brackets

Attach the X Clip and Install the Mounting Brackets
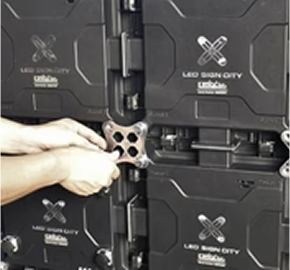
Place the X Clip in the center of every four cabinets and screw in the bolts to hold the clip in position.

Position the brackets on the back of the sign and use the provided bolts to secure the brackets to the sign (Connet brackets as needed for install).
At every intersection where four cabinets meet, place an X Bracket.
Use the provided M10 bolts to secure the bracket to the rear of the cabinets.
These reinforce the sign structure and keep cabinets square.
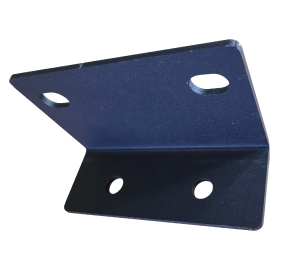
Step 4: Install the Mounting Brackets

Locate the pre-drilled holes on the back of the cabinet frame.
Position the mounting brackets and attach them with the provided bolts.
Connect or extend the brackets as needed for your specific installation (e.g., wall, post, custom frame).
Final Step: Lock Sections and Complete Assembly
Do a final pass across the front of the sign to ensure LED alignment between sections.
Double-check that:
All rubber seals are seated
All edges are closed off
All bolts are tightened
X Brackets and Mounting Brackets are securely fastened
> Your LED Sign is now fully assembled and ready for electrical setup and mounting.
Phase 4: Wiring Instruction
All cables on your LED sign use quick-connect connectors that plug directly into ports on the back of the sign. Each section of the sign — primary (main control) and secondary — has clearly labeled ports for power, data, and accessories.
Before powering on, follow the steps below to ensure everything is connected properly.
Main Sign Section (Primary Panel)
This section houses the brains of the sign and powers the antenna and brightness sensor.
Top Right – 4-Pin Connector: Brightness Sensor
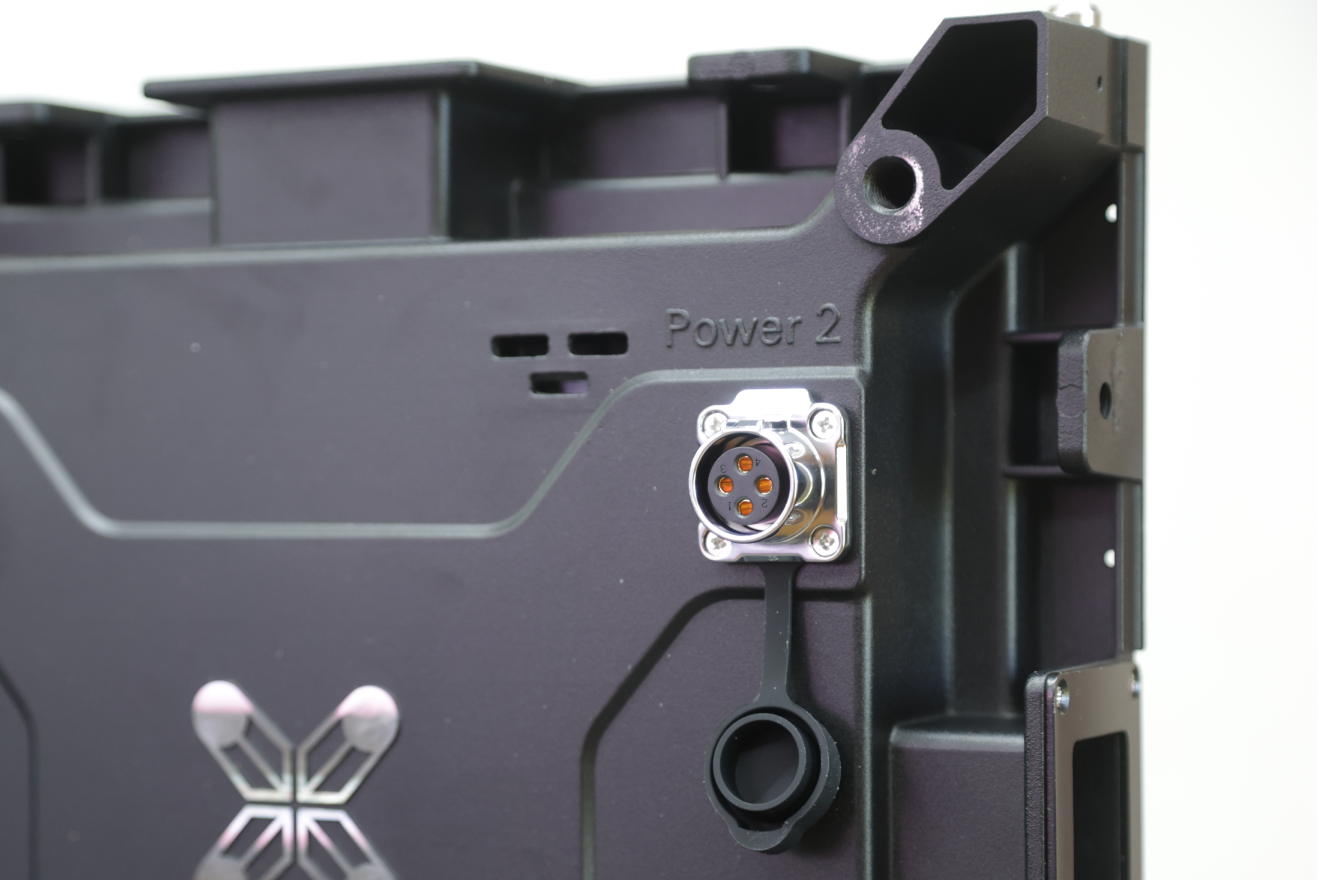
This port is used to automatically adjust screen brightness based on ambient light.
Plug the 4-pin sensor cable directly into this port.
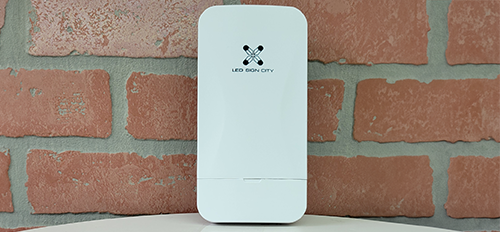
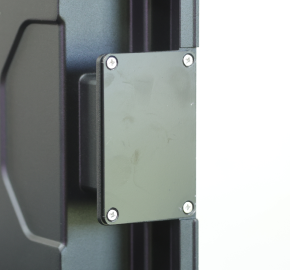
Bottom Right – 9-Pin Connector: Antenna Port
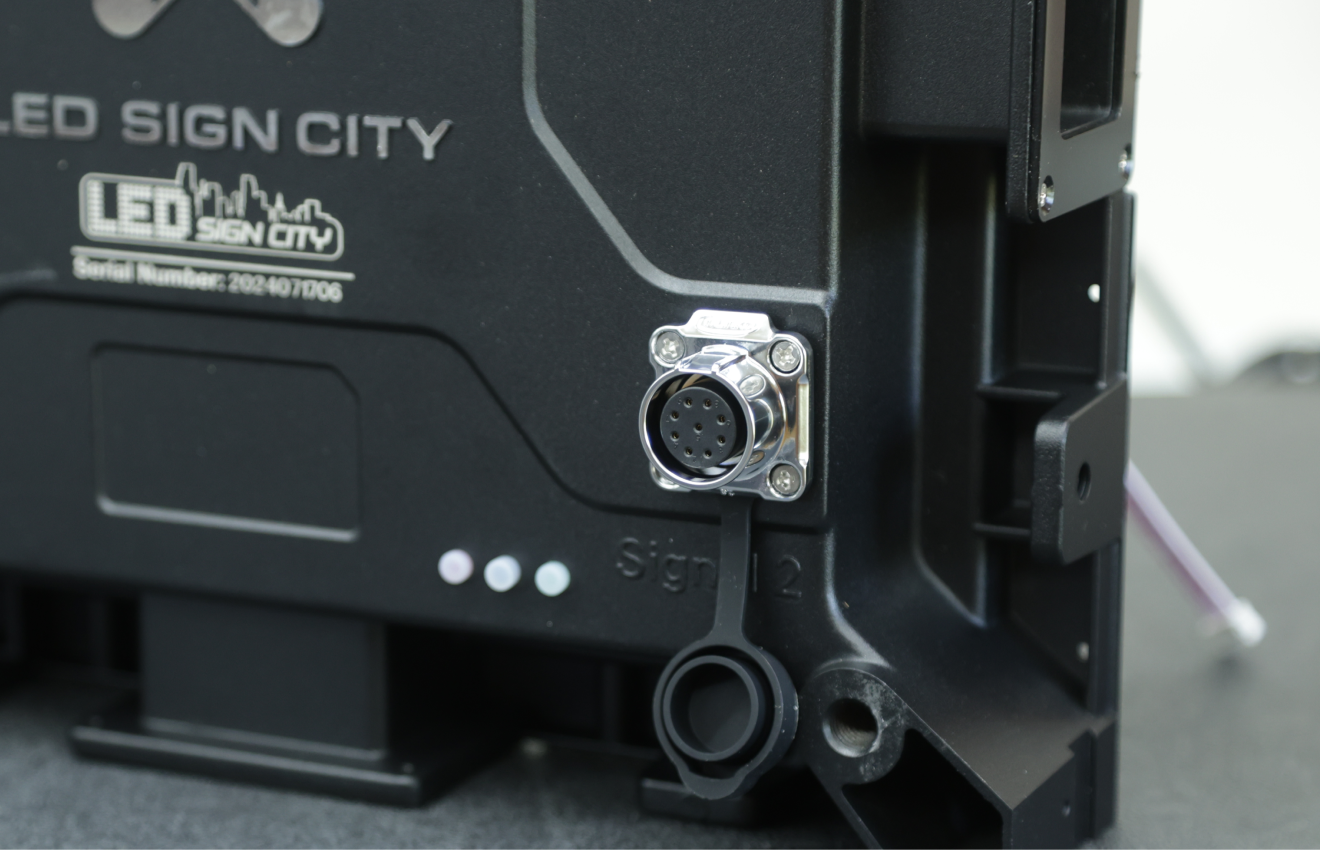
This port powers the antenna via a 24V POE (Power over Ethernet) output.
Plug the cable into the WAN/POE port on the antenna.
The antenna is designed to mount directly on or near the sign for optimal signal
strength.
Top Left – 3-Pin Connector: Power Input
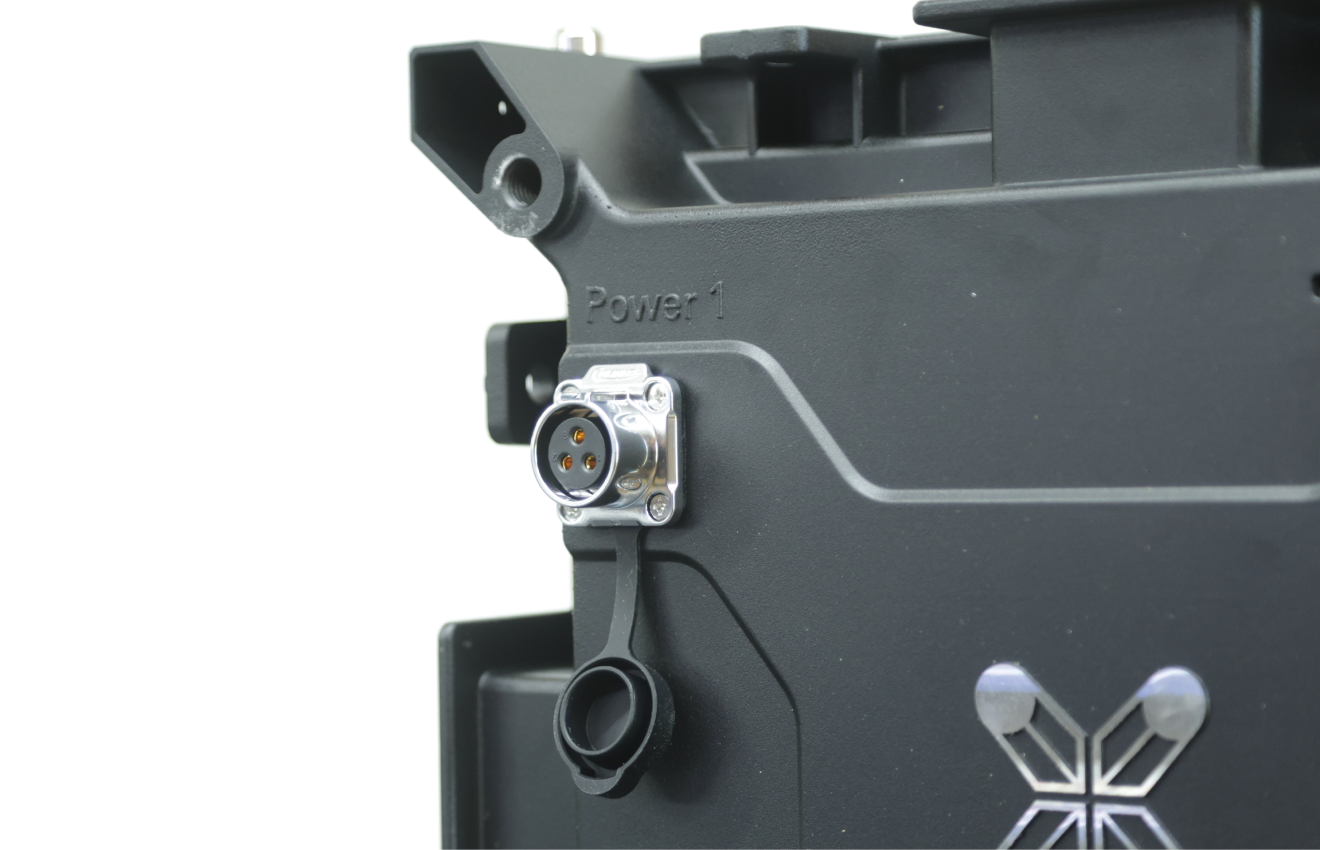
This is where the main power is supplied to the sign.
Use the provided 3-pin power connector and ensure it's securely locked into place.
Bottom Left – 9-Pin Connector: Video Signal Out
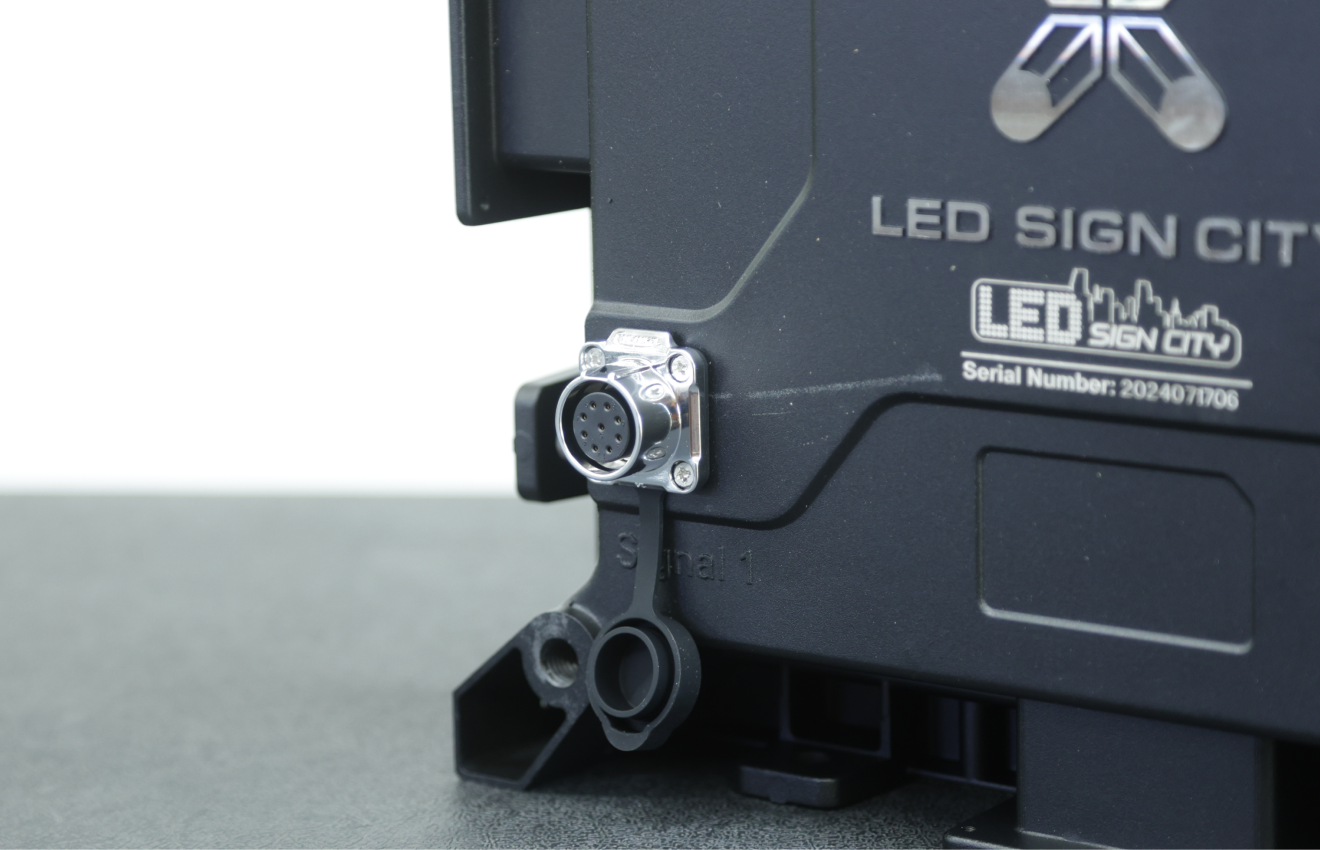
This port sends the video signal to any secondary sections of the sign.
Connect it to the first secondary panel's video input using the supplied 9-pin video
signal cable.
Secondary Sign Sections (Additional Panels)
Each additional sign section receives power and video from the previous panel.
Top – Two 3-Pin Power Ports
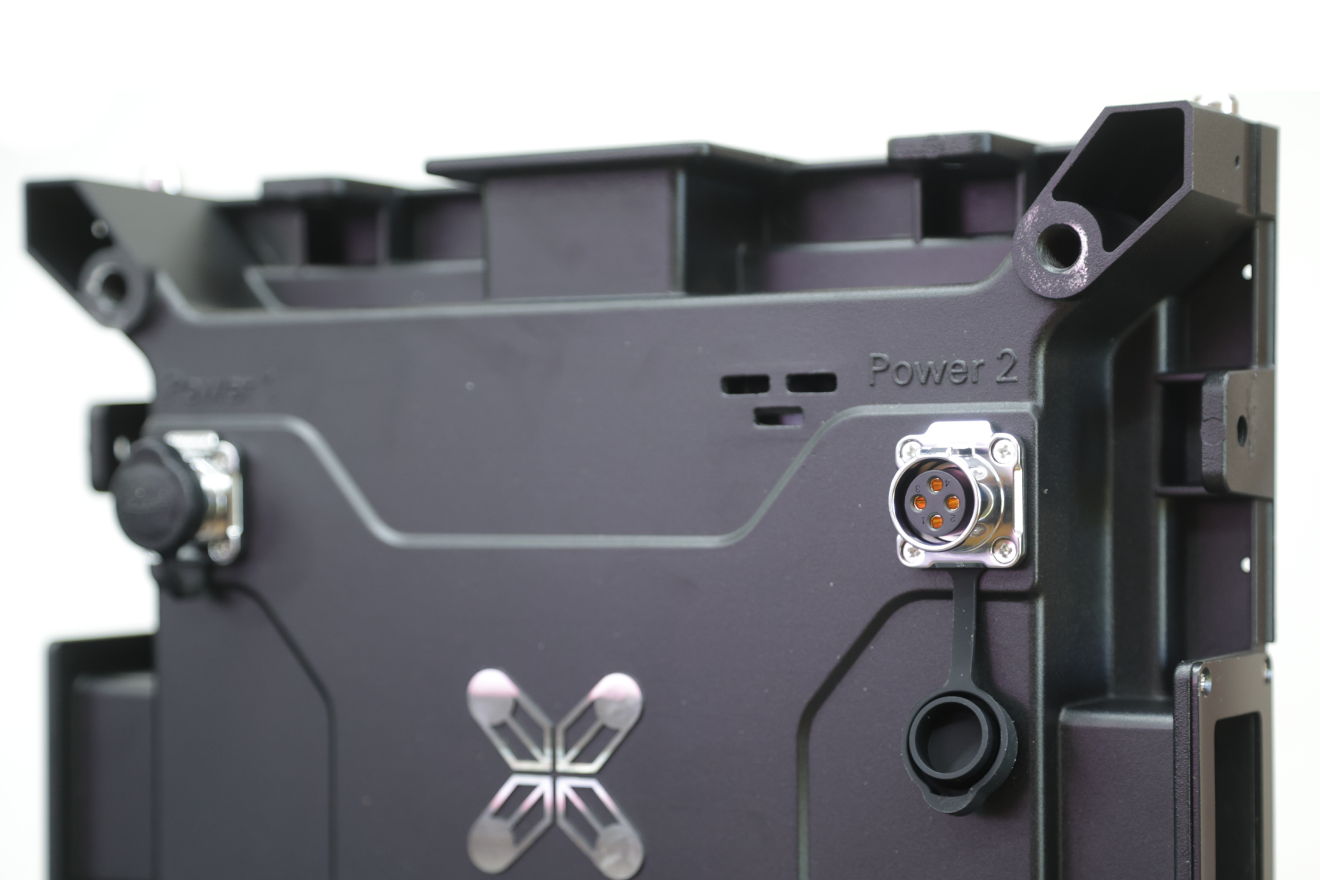
These ports allow power to flow to or from other sections.
One port receives power, the other can pass power forward to the next section.
Use the supplied 3-pin power cables to daisy-chain power between sections.
Bottom – Two 9-Pin Video Ports
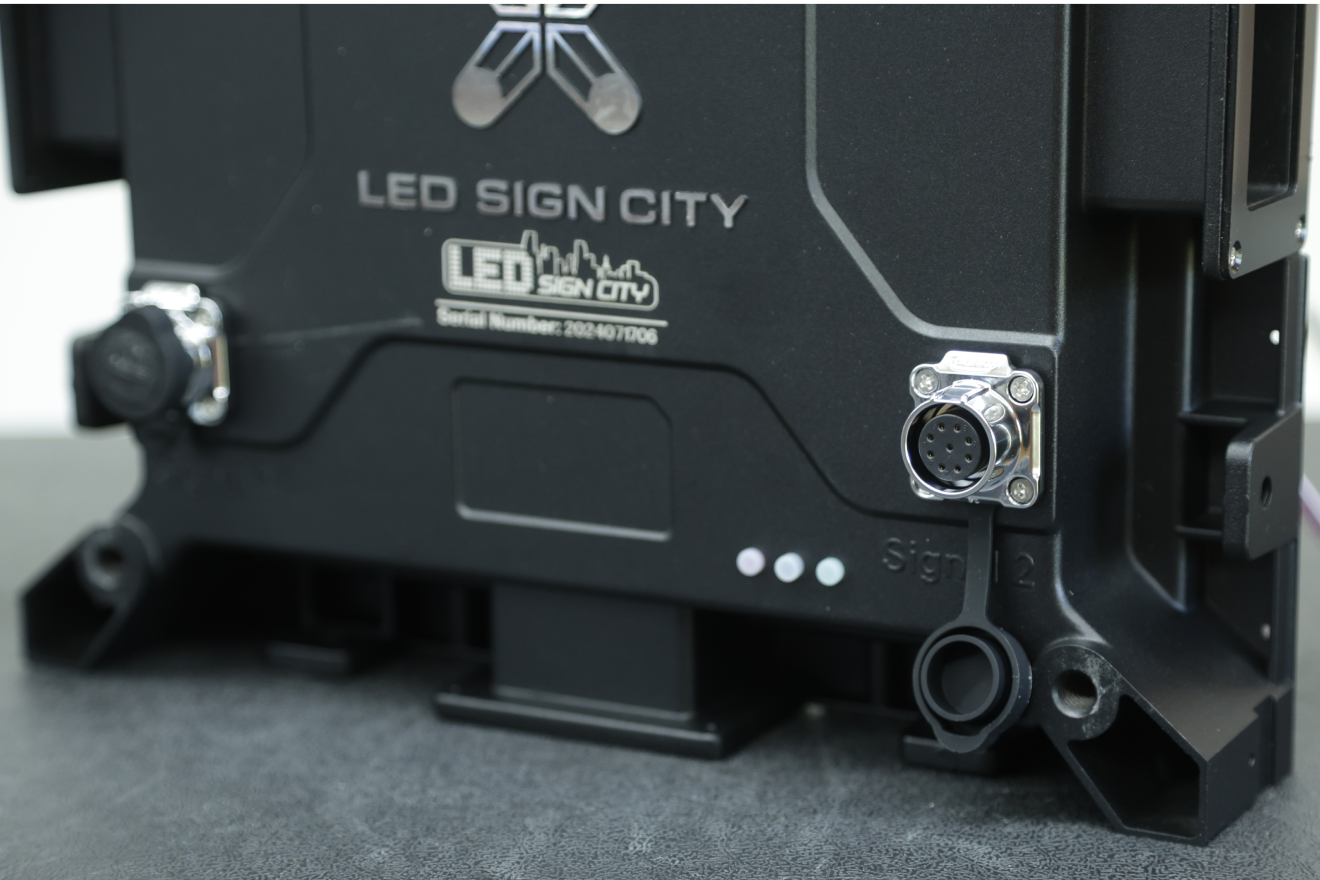
These ports transfer the video signal from panel to panel.
One port receives video from the previous section.
The other sends video to the next.
Connect the panels in sequence using the quick-connect 9-pin signal cables.
Wiring Diagram
Refer to the diagram below for a visual reference on connecting your:
- Brightness sensor
- Antenna
- Power input
- Video signal daisy chain
- Secondary panel power and signal pass-through
> Important:
- Double-check that all connectors are fully seated and latched.
- The antenna must be connected to the powered 9-pin POE port (bottom right of the main panel).
- Power should only be supplied to the main section — never plug multiple power sources into different panels.
Phase 5: Installation Examples
Want Us to Install It for You?
We offer professional installation services to make the process completely hassle-free. From design and permitting to final setup, our team handles every detail so you can focus on enjoying your new LED sign.
Managing the Installation Yourself?
We provide all the resources and guidance you need to simplify the process. With detailed instructions, expert tips, and dedicated support, installing your LED sign is straightforward and stress-free.
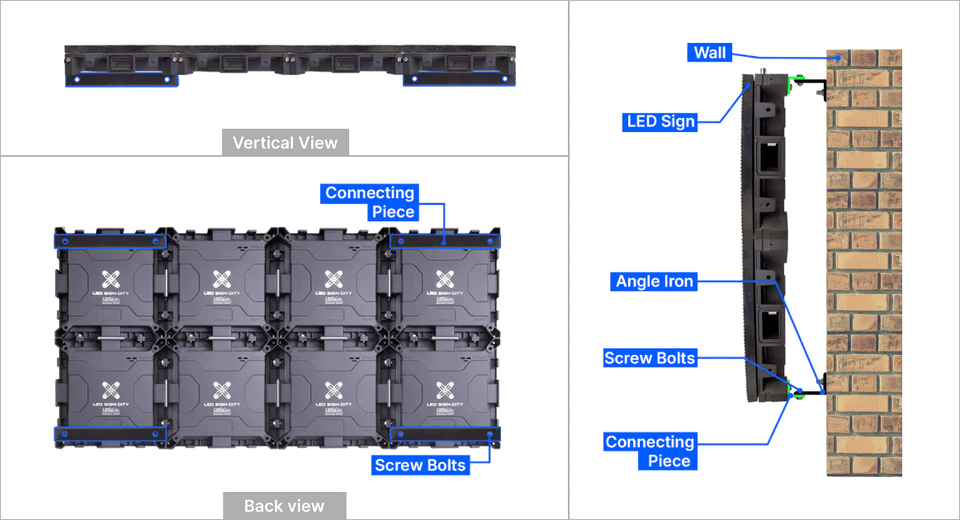
Mounting ideas for your LED sign.
Tools and parts required in this step
Angle Iron (L- Bracket)
Support bar / Frame – Illustrated below but not provided
Below are examples of how your LED Sign can be installed. The illustrations provided are for reference only. Always follow your local laws for guidance and construct structure based on required wind load rating and other local requirements.
LED sign installed on a single pole
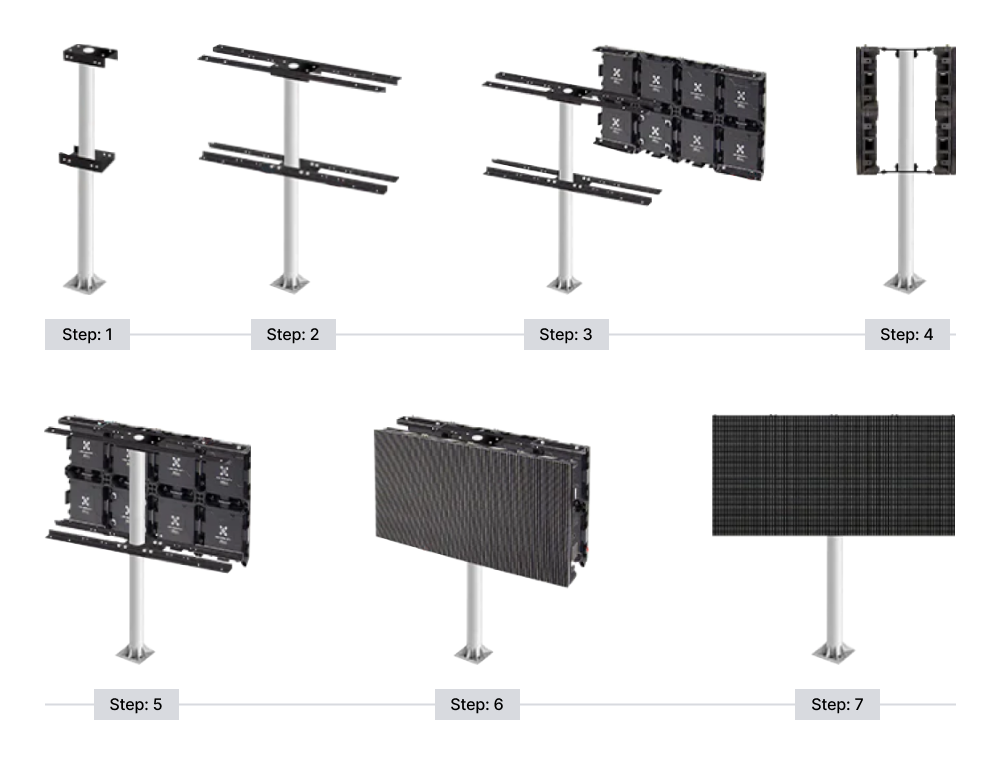
LED sign installed on double poles: Center-pole mount

LED sign installed on double poles: End-pole mount

Outdoor Wall Mounted LED Display
Phase 6: Software Download
PC Setup – On-Site Management
Control your LED sign locally using a Windows or macOS laptop/PC. Update and manage content securely and efficiently while you're on-site.
1. Download Viplex Express: Your LED Sign Programming Software
The software for your sign is Viplex Express. Once your download is complete, open the Viplex Express (.exe) file and complete the installation.;
- To connect your computer directly, connect the second LAN / Ethernet cable to the LAN port of the POE injector. And connect the next end to your computer's LAN / Ethernet Port.
- Open your control panel and select Network and Internet.
2. Connecting Computer to the LED Sign
You may have two CPE antennas, a Client, and Access Point, depending on your selections. Or you may have a single 4G modem. Below are the steps for connecting with the CPEs or optional 4G modem.
Connecting with the CPE Antennas.
The CPE antenna creates a local network that you can use to connect to your sign. There are two ways to connect your computer to the sign using the CPE antennas.
A. Access Point Only (Best for Close Proximity). Using just the access point is possible if your office is close to the sign. The access point will create a local network. The local Network is called 'Signcity' out of the box, and the password is Signcity123 (case sensitive).
a. To use this method, connect the Access Point to your sign and wait for all lights on the side to be lit. Typically it takes about 2 minutes.
b. Open your Wi-Fi settings and connect to the Signcity network (enter password above).
c. After you connect, open the Viplex Express and move to the next step.
B. Access Point and Client (For Extended Coverage). Using the Client and the access point together extends the Network and lets you connect over a further distance. When using the access point and Client together, you can connect wirelessly over Wi-Fi or directly with the provided LAN/Ethernet cables.
a. Connecting wirelessly: Connect the Client to the antenna port on the sign.
i. Use the provided POE injector to connect the power to the access point. To power the Access point, plug the ethernet cable into the POE port on the POE injection.
ii. Wait for the access point to power on, and all the lights are lit. You can verify that you have a good connection by looking at the lights on the Client.
iii. The first two lights, Power and Lan, should be constantly lit. You may notice that the LAN light intermittently flashes. The three lights above display the signal strength.
iv. Three (3) lights indicate that you have an excellent connection to the access point. To maintain the best connection, position the Access point and Client within the line of sight of each device.
b. Connect the computer to the Signcity network, then proceed to the next step.
i. Select Network and sharing center and then change adapter options.
ii. Right-click on your Ethernet Adapter and select properties
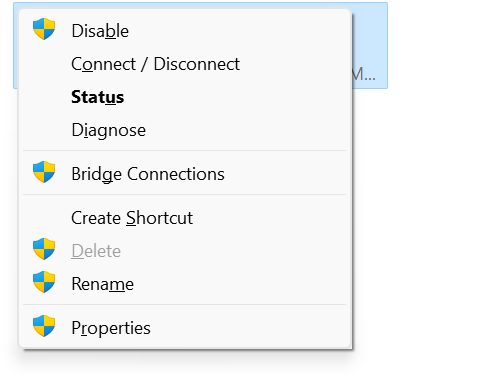
iii. Select IPV4 and select properties.
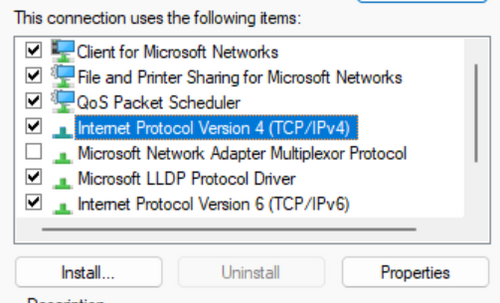
iv. Now, select 'Use the following IP address, then enter the following IP address: 10.1.10.127
v. Click into the subnet mask field. And enter the 255.255.255.0
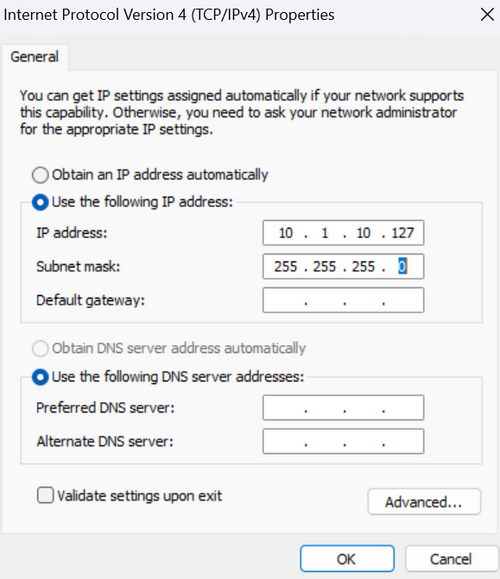
vi. Leave the remaining fields blank then, select Ok, and then close.
c. An alternative option is to connect the LAN Port to your router. Some routers do not require any changes. In other cases, we must reconfigure the Access point and Client to match your network settings
d. Finally, the Access Point can also be reconfigured as a repeater to extend your Network to the sign. To attempt this route, contact us to schedule your session. Charges may apply.
e. Still unable to connect?
If the settings above do not work, connect to the sign's backup network to check the network configurations. To access this network, you must be very close to the sign. And have a laptop with Viplex Express installed.
i. Stand very close to the sign and search for the WIFI network called AP###### (AP
followed by a series of numbers)
ii. Connect to the network and enter the
password 12345678
iii. Open Viplex Express, select Async and select the terminal
tab
iv. Confirm that the player is listed and verify the activity status icon on
the left.
v. Green means you are connected and logged in. Orange means you are
connected but not logged in. If the icon is orange, click connect and enter username
admin and password 123456.
vi. Click the Control tab at the top and then select
Network Configuration.
vii. Modify the settings for Wired Network.
a. Uncheck DHCP if checked -Change the IP address to 10.1.10.128
b. Enter the Subnet mask 255.255.255.0
-Gateway: 10.1.10.254
-DNS: 8.8.8.8
Once complete, resume set up using your chosen connection method above and move to the next step.
Connect the sign to optional 4G antenna (Wireless Connectivity Anywhere)
If you selected the optional 4G modem, connect the modem to the antenna port on the sign. Wait for the modem to power on. Then search for the wireless network 'Signcity' and enter password Signcity123. Once connected, open Viplex Express and proceed to the next step.
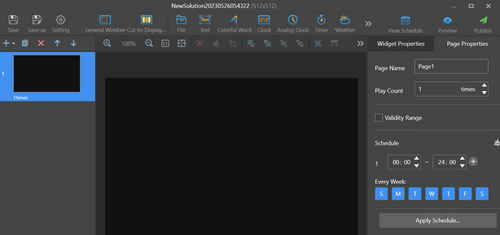
Initial setup of Viplex Express
When you launch Viplex Express for the first time, you have two choices, Studio Mode and Async Mode.
Studio Mode refers to a live connection where your screens play
advertisements directly from an external source such as your computer. Studio mode
is an optional upgrade. If you did not purchase this addon, select Async
mode.
Async Mode is an offline connection where you upload
content to the sign's local storage using your PC or mobile device.
The
device will be listed on the terminal table when you connect to the Signcity
or AP network.
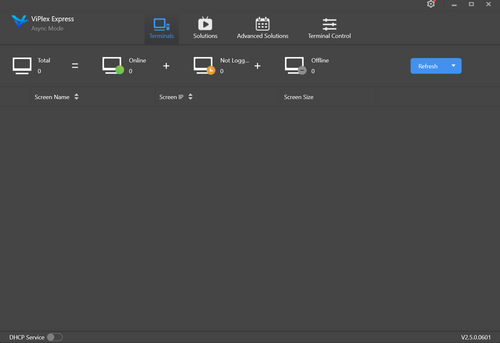
The image below shows the possible device status.

Once the player is listed, it may log in automatically. If successful, the player
will show a green icon to indicate that the player is online.
Sometimes, you
see an orange icon next to the player. The orange icon means you connected to the
player but have not logged in. If this happens, click the connect and enter the
username, admin, and password: 123456.
Once you log in, take note of your
screen size. Then click the Solutions tab.
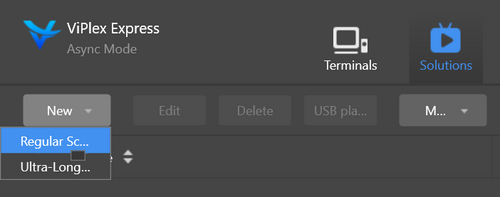
Click new Solution, then select regular screen.
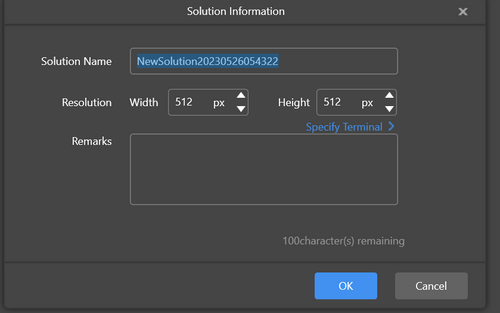
Name your Solution and then enter your screen size; Width and Height and click OK.
You can import your images and videos on the next page or create new text files. You can also add other elements, such as time and weather.
Once completed, click publish to upload your Solution to the sign.

Now that you have the basics, you can experiment with the various elements. Publish
your creations to see how it looks on your sign. And if you still need to.
Schedule An LED Software Training Session!
Notes:
Access Point: A device that creates a local Wi-Fi
network, ideal for locations close to the sign.
Client: A device that works with the Access Point to extend the Wi-Fi coverage, suitable for larger areas.
4G Antenna: Provides wireless internet connectivity, perfect for remote or hard-to-reach locations.
Mobile App – On-Site Management
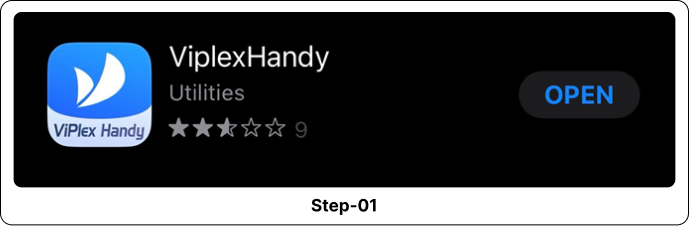
Manage your LED sign without an internet connection using the Viplex Handy mobile app. Follow these simple steps to get started:
Step 1: Download the App
Visit the App Store or Play Store, search for "Viplex Handy," and download the app. Once installed, you're ready for the next step.
Step 2: Connect to the Sign's Wi-Fi
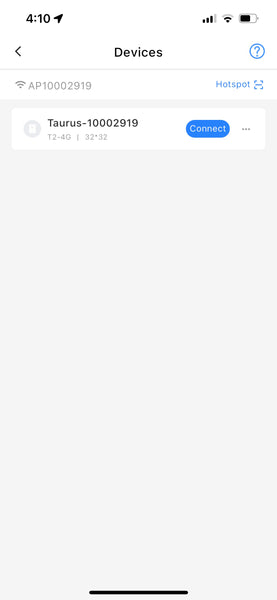
Open your Wi-Fi settings and search for the network name AP###### (AP followed by a series of numbers). Select this network to connect.
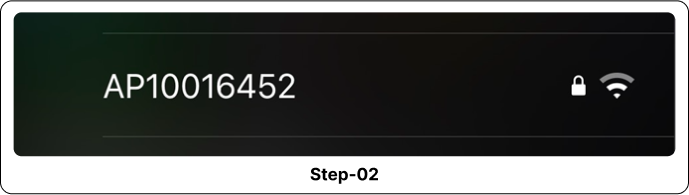
Step 3: Enter the Password
- For signs purchased before March 2024, enter the password: "12345678" when prompted.
- For signs purchased after March 2024, enter the password: "SN2008@+" when prompted.
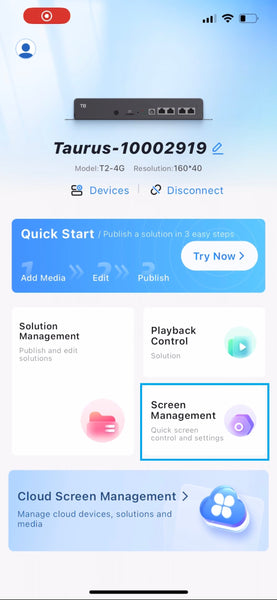
Step 4: Open Viplex Handy App
Open the Viplex Handy app and select "Add Device"
Click "Connect"
For signs purchased before March 2024, enter the password: "123456" when prompted.
For signs purchased after March 2024, enter the password: "SN2008@+" when prompted.
Bonus Step: How to Adjust the Time (Clock)
Cloud Setup – Off-Site Management
Unlock the full potential of your LED sign! This guide will walk you through a smooth login process, empowering you to manage your sign wirelessly – all from the comfort of your laptop or mobile device using VNNOX.
Ready to take control? Here's what you'll need:
- Your laptop or mobile device with internet access
- The email address associated with your LSC sign's control system
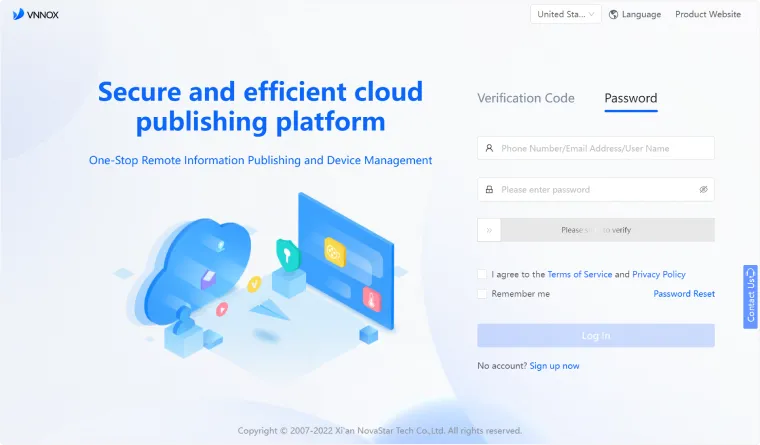
Step 1
- Head to the Login Page:
- Visit the VNNOX login page: 👉 Click Here
Step 2
- Email to the Rescue:
- Enter the email address/ User ID from which you were sent an invite to your VNNOX account.
- Insert the password that was sent to your email
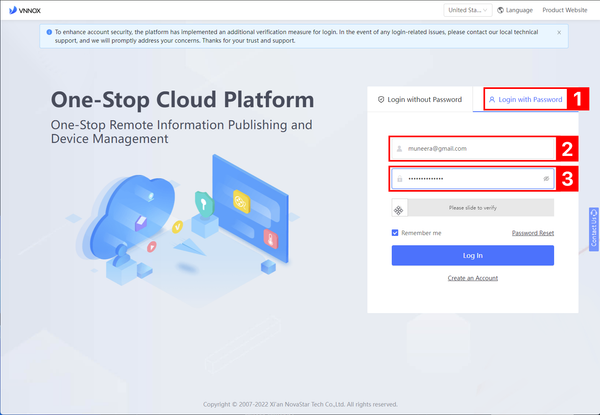
Step 3
- Slide the verification bar from left to right to complete the verification process.
- Click Submit

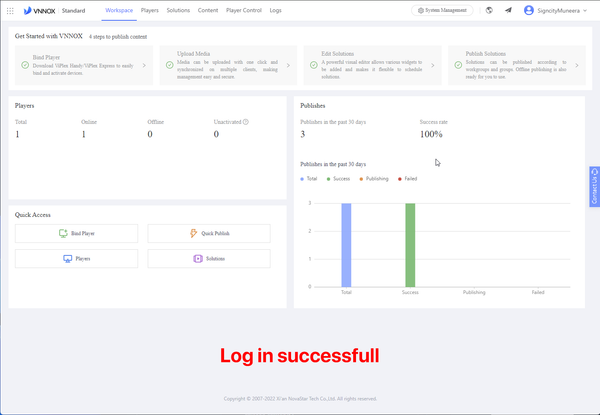
Welcome!
Now you can start managing your sign from anywhere in the world!
Still Facing Challenges?
If you encounter any difficulties after following these steps, don't hesitate to seek help! We are here to assist you.
Schedule a Software Support Session→
Bonus Tip
- Want to see how to use VNNOX to manage your LED sign? 👉 Click Here to Get Started.
Phase 7: Content Management
Create a Design Account
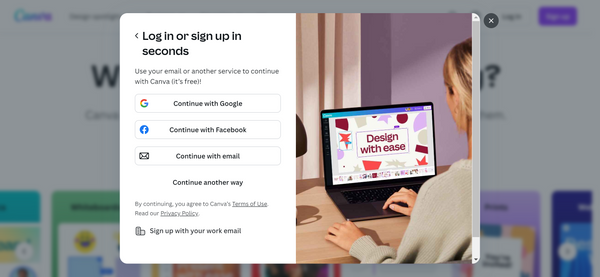
1. How to Set Up Your Canva Account
Canva is an online graphic design platform used by millions for creating everything from social media posts to business presentations. Whether you're a professional or just someone who wants to design beautiful graphics for personal projects, Canva offers both free and paid options that cater to various needs.
Follow these steps to create your Canva account:
Step 1: Access the Canva Website
Open your preferred browser and
visit www.canva.com. This will
take you directly to Canva's homepage.

Step 2: Click on "Sign Up"
On the homepage, find the "Sign Up"
button in the top right corner of the screen. Click on it to begin creating your
account.
Step 3: Choose Your Account Type
Canva offers multiple account
options:
- Free Account: Ideal for individuals and small projects, providing access to a variety of tools and templates.
- Canva Pro: A paid option with advanced features like premium templates, brand kits, and team collaboration tools.
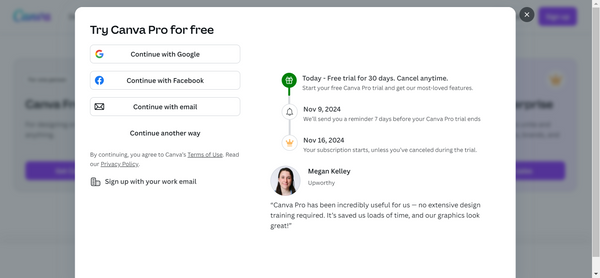
- Canva for Enterprise: Designed for larger organizations with advanced workflows, team management, and custom branding solutions.
- Canva for Nonprofits: If you're part of a registered nonprofit organization, Canva offers a special plan that provides premium features for free. To apply for this account type, you'll need to submit documentation verifying your nonprofit status.
Most users start with the Free Account to explore the platform. Click "Get started for free" to continue, or choose another option if it better fits your needs.
Step 4: Sign Up Using Your Email or Social Media
You can sign up
using your email address or connect your social media accounts like Google or
Facebook:
- Email: Enter your email in the provided field and click "Continue."
- Social Media: Click on the Facebook or Google icon and authorize Canva to access your account details.

Step 5: Set Up an Account for Your Organization or Nonprofit (If
Applicable)
If you're setting up a Canva account for an
organization or nonprofit, consider the following:
- Canva for Pro or Enterprise: Choose the plan that suits your organization's needs. Canva may offer a trial period for Pro or Enterprise accounts, allowing you to test the features before committing.
- Apply for Canva for Nonprofits: Visit Canva's Nonprofit page to fill out an application form. You'll need to provide proof of your organization's nonprofit status, such as a registration document. Once approved, your nonprofit will have access to premium features for free.
- Invite Team Members: Canva allows you to invite colleagues or team members to join your account. You can add them directly through the dashboard once your organization's account is set up.
Step 6: Create a Secure Password
If you sign up with your email,
you'll be prompted to create a password. Choose a strong password using a mix of
uppercase, lowercase letters, numbers, and symbols. Click "Sign Up" to complete this
step.
Step 7: Explore Canva's Features
Welcome to Canva! You now have
access to the platform. Take your time exploring templates, tools, and features to
start designing your own graphics.
2. Additional Tips
- Ensure you're logged into the correct account before clicking the icon.
- Forgot your password? Click on "Forgot password?" on the login page to reset it.
- For Nonprofits: After approval, Canva will grant you access to their premium features at no cost. This can be particularly useful for creating promotional materials, event graphics, and more.
Now that you've successfully signed up, you can start creating designs!
Design Your Ads
Welcome to the world of LED sign advertising! In this quick and easy guide, we'll show you how to design compelling ads for your LED sign, step by step. We've also thrown in some short video tutorials to make your journey even smoother. So, without further ado, let's dive in.
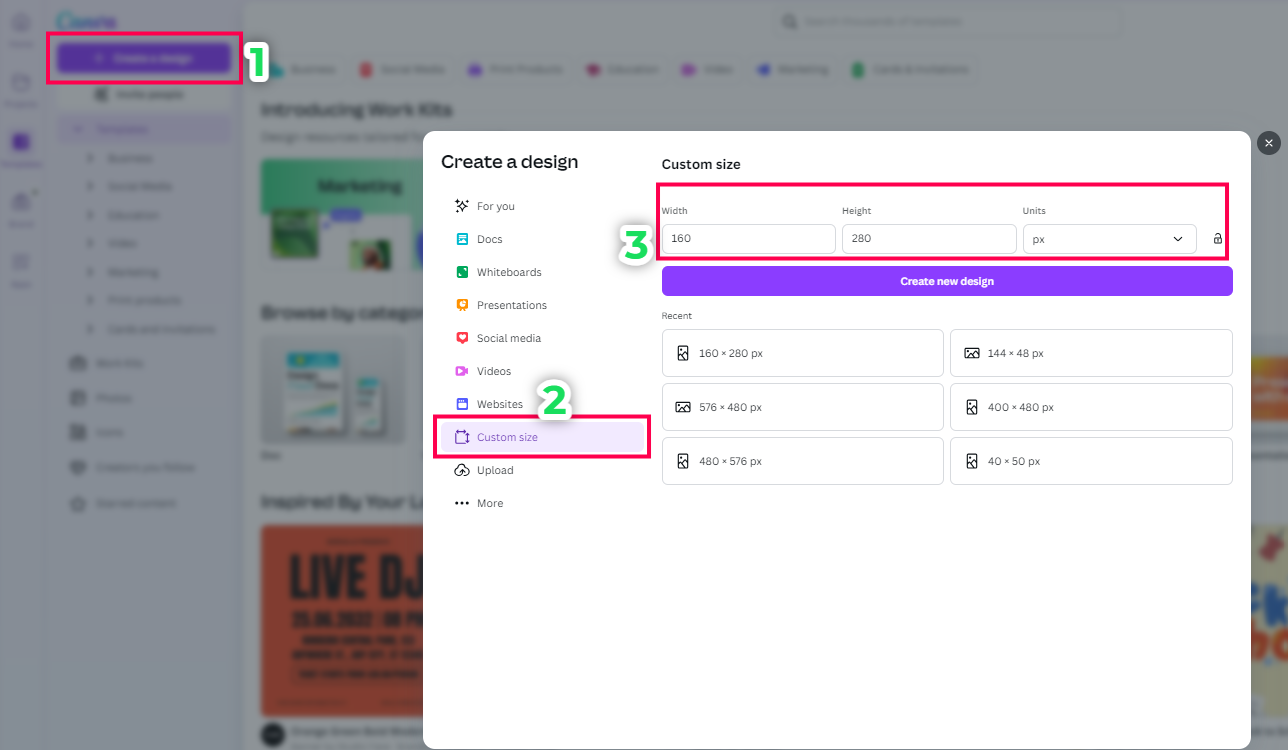
Step 1: Calculate the Aspect Ratio
Every LED sign comes in different sizes, and to make sure your message fits perfectly, it's essential to match the size of your images and videos to the actual layout of the sign. Here's how to calculate the aspect ratio:
- Option A: Calculate the Aspect Ratio Mathematically
To calculate the aspect ratio of your sign, you'll need to know the resolution per module (which you can find in the sign's technical specs). Then, use these formulas:
- Option B: Non-Mathematical Method (Recommended)
If you want to skip the math, just go to the product page and check the Technical specifications. This will show the total pixel height and width of the sign.
Type "4x7" into the website's search box.
ii. Find the Product Page
Look for the product page titled LED Sign City Series 4x7.
iii. Scroll to Tech Specs
Scroll down to the technical specifications (Tech Specs) section.
iv. Check the P8 Resolution
In the Tech Specs, find the P8 resolution section, where you'll see the total pixel height and width of the sign
Step 2: Change the Background Color
- Your background sets the stage for your message. But
here's a design tip: avoid plain white backgrounds. Instead, opt for colors that
complement your brand. Pick shades that convey your message
effectively.
Step 3: Add Short Text
- Short and sweet is the name of the game. Limit your text
to no more than seven words per line and a maximum of five words in every line.
Your audience is on the move, so make every word count.
Step 4: How to Upload Images and Videos
- If you've got a logo, just drag and drop it into your ad.
Your logo is your brand's identity, so make sure it's prominently
displayed.
Step 5: How to Use Stock Images
- Visuals are a powerful tool. Use images from the library
that resonate with your message. Be it products, smiling faces, or captivating
landscapes, choose images that speak to your audience.
Step 6: Transition Effects - Let Words Dance
- Make your words come alive with transition effects. A
little movement can catch more eyes. Experiment with various transitions to find
the one that suits your message.
Step 7: Rinse and Repeat
- Consistency is key for message retention. Use the same
colors, fonts, and design elements across your ads. When your audience sees your
ad, they should instantly recognize your brand.
Step 8: Export Your Masterpiece
- Once you're satisfied with your ad, it's time to export
it. Download the video, and you're one step closer to sharing your message with
the world.
Need Help with Your Ads?
- DIYing your ads is fantastic, but if you need some extra
support or want to take your ads to the next level, we're here to
assist.
Want a Shortcut? Schedule a Support
Session!
And there you have it -
your quick guide to creating stunning LED sign ads. We hope this helps you create
engaging and effective advertisements that capture your audience's attention. Happy
designing! 🎨📢
Upload Your Designs
Follow this quick guide to seamlessly upload your video to Vnnox and get your content shining bright.
Step 1: Sign in to the Vnnox account
- Visit the VNNOX login page: 👉 Click Here
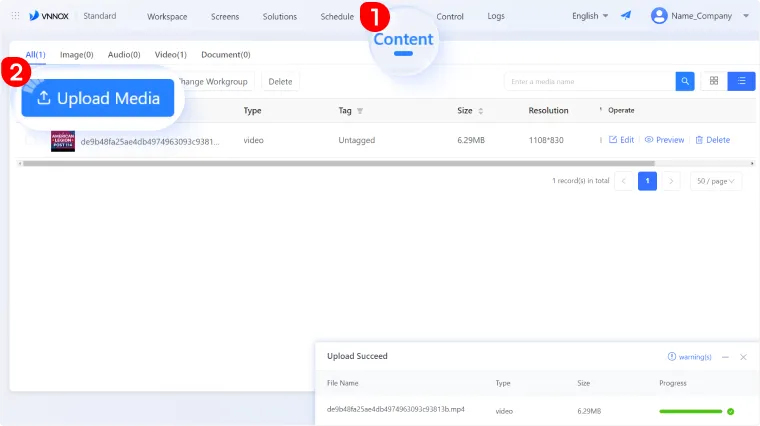
Step 2: Upload Your Video
Head to the "Content" tab and upload your video file. Simple, right?
Step 3: Add a New Solution
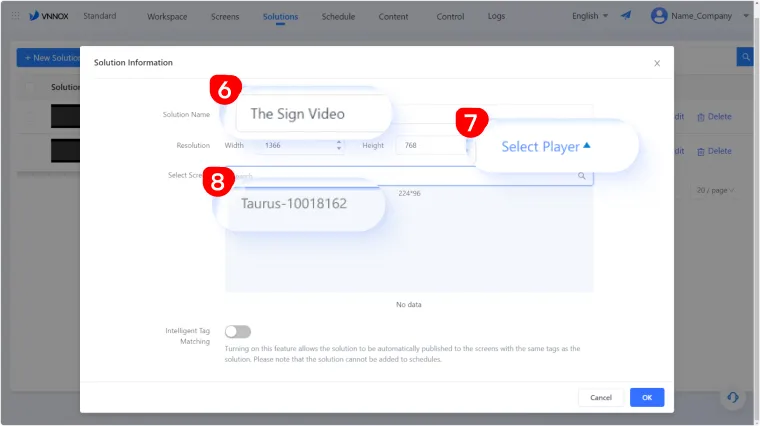
Move to the "Solution" tab and click "Add New Solution."
Pro Tip: In Vnnox, a "Solution" is essentially a playlist or a collection of content items. When you create a solution, you're organizing multiple images, videos, and texts into one cohesive playlist. This allows you to easily manage and display a sequence of content on your LED sign without manual intervention

Step 4: Name Your Solution
-
Give your solution a memorable name to keep things organized.
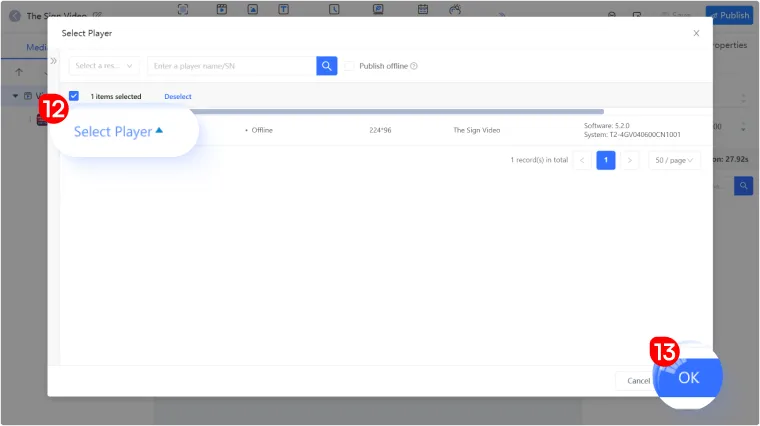
-
Click the "Player" button and select the appropriate player from the list
- Click "OK" to confirm your choice
Step
5:
Select Your Video File
Click the video icon, choose your uploaded video file from Step 2, and click OK
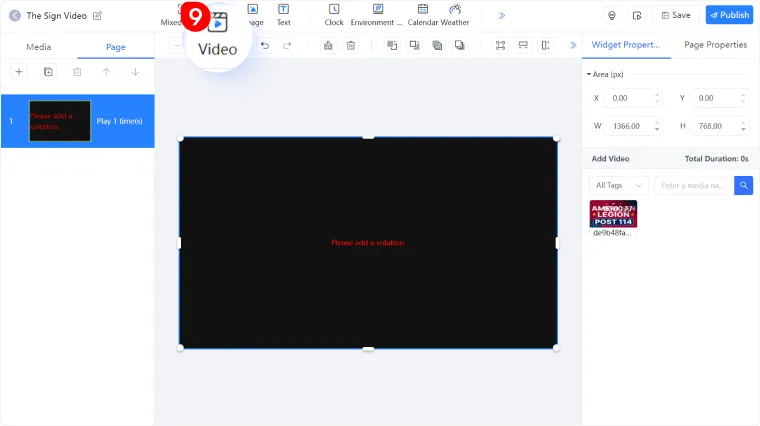
Step 6:
Link the Video to Your Solution
-
Select your newly uploaded video file
-
Click "OK" to link it to your solution
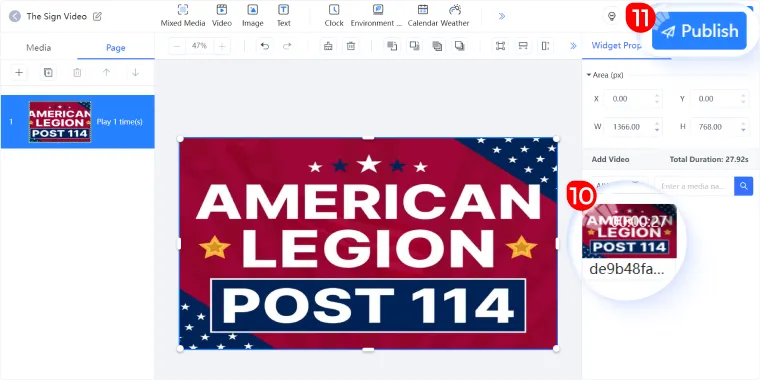
Step 7:
Publish Your Video
Hit "Publish" to send your video to the player.
There you have it! Your video is now primed to captivate your audience.
Happy showcasing!
Bonus
Tip:
Did you know you can also show the local temperature and weather on your LED sign?